|
|
|
UPAC RESCUE
All Rights Reserve 2008-2011
To Serve And To Save
|
|
 |
Should an emergency arise when a sterile dressing is not available, the cleanest cloth at hand may be used—a freshly laundered handkerchief, towel, or shirt, for instance. Unfold these materials carefully so that you do not touch the part that goes next to the skin. Always be ready to improvise when necessary, but never put materials directly in contact with wounds if those materials are likely to stick to the wound, leave lint, or be difficult to remove.
DEFINITION OF A BANDAGE Standard bandages are made of gauze or muslin and are used over a sterile dressing to secure the dressing in place, to close off its edge from dirt and germs, and to create pressure on the wound and control bleeding. A bandage can also support an injured part or secure a splint. The most common types of bandages are the roller and triangular bandages.
Roller Bandage The roller bandage, shown in figure 3–2, consists of a long strip of material (usually gauze, muslin, or elastic) that is wound into a cylindrical shape. Roller bandages come in various widths and lengths. Most of the roller bandages in the first aid kits have been sterilized, so pieces may be cut off and used as compresses in direct contact with wounds. If you use a piece of roller bandage in this manner, you must be careful not to touch it with your hands or with any other unsterile object.
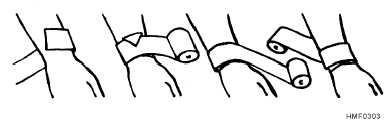
GENERAL APPLICATION.—In applying a roller bandage, hold the roll in the right hand so that the loose end is on the bottom; the outside surface of the loose or initial end is next applied to and held on the body part by the left hand. The roll is then passed around the body part by the right hand, which controls the tension and application of the bandage. Two or three of the initial turns of a roller bandage should overlie each other to properly secure the bandage (see figure 3–3). In applying the turns of the bandage, it is often necessary to transfer the roll from one hand to the
other. Bandages should be applied evenly, firmly, but not too tightly. Excessive pressure may cause interference with the circulation and may lead to disastrous consequences. In bandaging an extremity, it is advisable to leave the fingers or toes exposed so the circulation of these parts may be readily observed. It is likewise safer to apply a large number of turns of a bandage, rather than to depend upon a few turns applied too firmly to secure a compress. In applying a wet bandage, or one that may become wet, you must allow for shrinkage. The turns of a bandage should completely cover the skin, as any uncovered areas of skin may become pinched between the turns, with resulting discomfort. In bandaging any extremity, it is advisable to include the whole member (arm or leg, excepting the fingers or toes) so that uniform pressure may be maintained throughout. It is also desirable in bandaging a limb that the part is placed in the position it will occupy when the dressing is finally completed, as variations in the flexion and extension of the part will cause changes in the pressure of certain parts of the bandage. The initial turns of a bandage on an extremity (including spica bandages of the hip and shoulder) should be applied securely, and, when possible, around the part of the limb that has the smallest circumference. Thus, in bandaging the arm or hand, the initial turns are usually applied around the wrist, and in bandaging the leg or foot, the initial turns are applied immediately above the ankle. The final turns of a completed bandage are usually secured in the same manner as the initial turns, by employing two or more overlying circular turns. As both edges of the final circular turns are exposed, they should be folded under to present a neat, cufflike appearance. The terminal end of the completed bandage is turned under and secured to the final turns by either a safety pin or adhesive tape. When these are not available, the end of the bandage may be split lengthwise for several inches, and the two resulting tails may be secured around the part by tying. ROLLER BANDAGE FOR ELBOW.—A spica or figure-eight type of bandage is used around the elbow joint to retain a compress in the elbow region and to allow a certain amount of movement. Flex the elbow slightly (if you can do so without causing further pain or injury), or anchor a 2- or 3-inch bandage above the elbow and encircle the forearm below the elbow with a circular turn. Continue the bandage upward across the hollow of the elbow to the starting point. Make another circular turn around the upper arm, carry it downward, repeating the figure-eight procedure, and gradually ascend the arm. Overlap each previous turn about two-thirds of the width of the bandage. Secure the bandage with two circular turns above the elbow, and tie. To secure a dressing on the tip of the elbow, reverse the procedure and cross the bandage in the back (fig. 3–4). 3-4 Figure 3–2.—Roller bandages. Figure 3–3.—Applying a roller bandage.
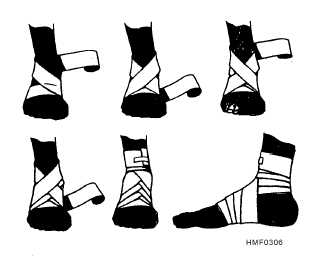
ROLLER BANDAGE FOR HAND AND WRIST.—For the hand and wrist, a figure-eight bandage is ideal. Anchor the dressing, whether it is on the hand or wrist, with several turns of a 2- or 3-inch bandage. If on the hand, anchor the dressing with several turns and continue the bandage diagonally upward and around the wrist and back over the palm. Make as many turns as necessary to secure the compress properly (fig. 3–5). ROLLER BANDAGE FOR ANKLE AND FOOT.—The figure-eight bandage is also used for dressings of the ankle, as well as for supporting a sprain. While keeping the foot at a right angle, start a 3-inch bandage around the instep for several turns to anchor it. Carry the bandage upward over the instep and around behind the ankle, forward, and again across the instep and down under the arch, thus completing one figure-eight. Continue the figure-eight turns, overlapping one-third to one-half the width of the bandage and with an occasional turn around the ankle, until the compress is secured or until adequate support is obtained (fig. 3–6). ROLLER BANDAGE FOR HEEL.—The heel is one of the most difficult parts of the body to bandage. Place the free end of the bandage on the outer part of the ankle and bring the bandage under the foot and up. Then carry the bandage over the instep, around the heel, and back over the instep to the starting point. Overlap the lower border of the first loop around the heel and repeat the turn, overlapping the upper border of the loop around the heel. Continue this procedure until the desired number of turns is obtained, and secure with several turns around the lower leg (fig. 3–7). R O L L E R B A N D A G E F O R A R M A N D LEG.—The spiral reverse bandage must be used to cover wounds of the forearms and lower extremities;
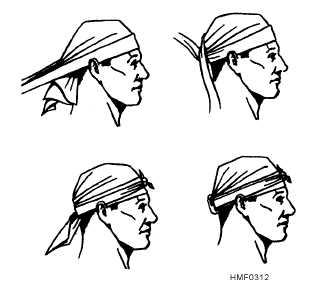
may be made by folding a large handkerchief diagonally. The longest side of the triangular bandage is called the base; the corner directly opposite the middle of the base is called the point; and the other two corners are called ends (fig. 3–11). The triangular bandage is useful because it can be folded in a variety of ways to fit almost any part of the body. Padding may be added to areas that may become uncomfortable. TRIANGULAR BANDAGE FOR HEAD.— This bandage is used to retain compresses on the forehead or scalp. Fold back the base about 2 inches to make a hem. Place the middle of the base on the forehead, just above the eyebrows, with the hem on the outside. Let the point fall over the head and down over the back of the head. Bring the ends of the triangle around the back of the head above the ears, cross them over the point, carry them around the forehead, and tie in a SQUARE KNOT. Hold the compress firmly with one hand, and, with the other, gently pull down the point until the compress is snug; then bring the point up and tuck it over and in the bandage where it crosses the back part of the head. Figure 3–12 shows the proper application of a triangular bandage for the head. TRIANGULAR BANDAGE FOR SHOULDER.— Cut or tear the point, perpendicular to the base, about 10 inches. Tie the two points loosely around the patient’s neck, allowing the base to drape down over the compress on the injured side. Fold the base to the desired width, grasp the end, and fold or roll the sides toward the shoulder to store the excess bandage. Wrap the ends snugly around the upper arm, and tie on the outside surface of the arm. Figure 3–13 shows the proper application of a triangular bandage for the shoulder. TRIANGULAR BANDAGE FOR CHEST.— Cut or tear the point, perpendicular to the base, about 10 inches. Tie the two points loosely around the patient’s neck, allowing the bandage to drape down over the chest. Fold the bandage to the desired width, carry the ends around to the back, and secure by tying. Figure 3–14 shows the proper application of a triangular bandage for the chest. TRIANGULAR BANDAGE FOR HIP OR BUTTOCK.—Cut or tear the point, perpendicular to the base, about 10 inches. Tie the two points around the thigh on the injured side. Lift the base up to the waistline, fold to the desired width, grasp the ends, fold or roll the sides to store the excess bandage, carry the ends around the waist, and tie on the opposite side of the body. Figure 3–15 shows the proper application of a triangular bandage for the hip or buttock. TRIANGULAR BANDAGE FOR SIDE OF CHEST.—Cut or tear the point, perpendicular to the base, about 10 inches. Place the bandage, points up, under the arm on the injured side. Tie the two points on top of the shoulder. Fold the base to the desired width, carry the ends around the chest, and tie on the opposite side. Figure 3–16 shows the proper application of a triangular bandage for the side of the chest. TRIANGULAR BANDAGE FOR FOOT OR HAND.—This bandage is used to retain large compresses and dressings on the foot or the hand. For the foot: After the compresses are applied, place the foot in the center of a triangular bandage and carry the point over the ends of the toes and over the upper side of the foot to the ankle. Fold in excess bandage at the side of the foot, cross the ends, and tie in a square knot
in front. For the hand: After the dressings are applied, place the base of the triangle well up in the palmar surface of the wrist. Carry the point over the ends of the fingers and back of the hand well up on the wrist. Fold the excess bandage at the side of the hand, cross the ends around the wrist, and tie a square knot in front. Figure 3–17 shows the proper application of a triangular bandage for either the foot or the hand. CRAVAT BANDAGE.—A triangular bandage can be folded into a strip for easy application during an emergency. When folded as shown in figure 3–18, the bandage is called a cravat. To make a cravat bandage, bring the point of the triangular bandage to the middle of the base and continue to fold until a 2-inch width is obtained. The cravat may be tied, or it may be secured with safety pins (if the pins are available)
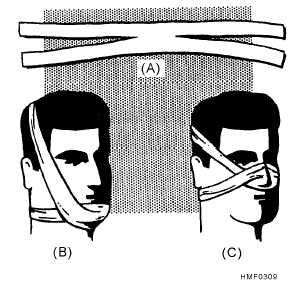
When necessary, a cravat can be improvised from common items such as T-shirts, bed linens, trouser legs, scarves, or any other item of pliable and durable material that can be folded, torn, or cut to the desired size. Cravat Bandage for Head.—This bandage is useful to control bleeding from wounds of the scalp or forehead. After placing a compress over the wound, place the center of the cravat over the compress and carry the ends around to the opposite side; cross them, continue to carry them around to the starting point, and tie in a square knot. Cravat Bandage for Eye.—After applying a compress to the affected eye, place the center of the cravat over the compress and on a slant so that the lower end is inclined downward. Bring the lower end around under the ear on the opposite side. Cross the ends in back of the head, bring them forward, and tie them over the compress. Figure 3–19 shows the proper application of a cravat bandage for the eye.
Cravat Bandage for Temple, Cheek, or Ear.—After a compress is applied to the wound, place the center of the cravat over it and hold one end over the top of the head. Carry the other end under the jaw and up the opposite side, over the top of the head, and cross the two ends at right angles over the temple on the injured side. Continue one end around over the forehead and the other around the back of the head to meet over the temple on the uninjured side. Tie the ends in a square knot. (This bandage is also called a Modified Barton.) Figure 3–20 shows the proper application of a cravat bandage for the temple, cheek, or ear. Cravat Bandage for Elbow or Knee.—After applying the compress, and if the injury or pain is not too severe, bend the elbow or knee to a right-angle position before applying the bandage. Place the
middle of a rather wide cravat over the point of the elbow or knee, and carry the upper end around the upper part of the elbow or knee, bringing it back to the hollow, and the lower end entirely around the lower part, bringing it back to the hollow. See that the bandage is smooth and fits snugly; then tie in a square knot outside of the hollow. Figure 3–21 shows the proper application of a cravat bandage for the elbow or knee. Cravat Bandage for Arm or Leg.—The width of the cravat you use will depend upon the extent and area of the injury. For a small area, place a compress over the wound, and center the cravat bandage over the compress. Bring the ends around in back, cross them, and tie over the compress. For a small extremity, it may be necessary to make several turns around to use all the bandage for tying. If the wound covers a larger area, hold one end of the bandage above the compress and wind the other end spirally downward across the compress until it is secure, then upward and around again, and tie a knot where both ends meet. Figure 3–22 shows the proper application of a cravat bandage for the arm, forearm, leg, or thigh. Cravat Bandage for Axilla (Armpit).—This cravat is used to hold a compress in the axilla. It is similar to the bandage used to control bleeding from the axilla. Place the center of the bandage in the axilla over the compress and carry the ends up over the top of the shoulder and cross them. Continue across the back and chest to the opposite axilla, and tie them. Do not tie 3-11
too tightly or the axillary artery will be compressed, adversely affecting the circulation of the arm. Figure 3–23 shows the proper application of a cravat bandage for the axilla. BATTLE DRESSING A battle dressing is a combination compress and bandage in which a sterile gauze pad is fastened to a gauze, muslin, or adhesive bandage (fig. 3–24). Most Navy first aid kits contain both large and small battle dressings of this kind. RESCUE AND TRANSPORTATION LEARNING OBJECTIVE: I d e n t i f y protective equipment items that are used during patient rescues, and recall how and when each protective equipment item should be used. It is a basic principle of first aid that an injured person must be given essential treatment before being moved. However, it is impossible to treat an injured person who is in a position of immediate danger. If the victim is drowning, or if his life is endangered by fire, steam, electricity, poisonous or explosive gases, or other hazards, rescue must take place before first aid treatment can be given. The life of an injured person may well depend upon the manner in which rescue and transportation to a medical treatment facility are accomplished. Rescue operations must be accomplished quickly, but unnecessary haste is both futile and dangerous. After rescue and essential first aid treatment have been given, further transportation must be accomplished in a manner that will not aggravate the injuries. As a Corpsman, it may be your responsibility to direct—and be the primary rescuer in—these operations. The life and safety of the victim and the members of the rescue team may rest on your decisions. In this section, we will consider the use of common types of protective equipment; rescue procedures; special rescue situations; ways of moving 3-12
|
|
 |
|
|
|
Every Saturdays 1-5PM Rescue
Training Preparedness.
______________________________
May 26► Crime prevention seminar and brigada eskwela pulang lupa elementary school
May 27► "outreach program" to Isla Verde and Coastal Clean Up.
June 4► Auxillary Task Force fwith PNP on "balik eskwela".
June 11► Coastal CleanUp in Boracay with Philippine Coast Guard, Kabalikat, PNP and other NGO's (tentative)
June 17► PCRGA 6th Induction
|
|
May 10►tasking with DSWD on SAGIP KALINGA Project-Massive Rescue Operations
►"OPLAN SUMVAC". We have to participate together with the PNP in the maintenance of Public Safety and Risk Reduction as well in the maintenance of Peace and Order |
|
|
 |
|
| |
|
|